Offline First
Fleetingoften using crdt
yjs
discovering
in the command line, with deno
import { Doc } from "https://cdn.skypack.dev/yjs@^13.5.0"
import { WebsocketProvider } "https://cdn.skypack.dev/y-websocket@^1.3.0"

const doc = new Doc();
const ymap = doc.getMap("my-map")

ymap.observe(ymapEvent => {
    ymapEvent.target === ymap // => true

    // Find out what changed:
    // Option 1: A set of keys that changed
    ymapEvent.keysChanged // => Set
    // Option 2: Compute the differences
    ymapEvent.changes.keys // => Map

    // Sample code.
    ymapEvent.changes.keys.forEach((change, key) => {
        if (change.action === 'add') {
            console.log(`Property "${key}" was added. Initial value: "${ymap.get(key)}".`);
        } else if (change.action === 'update') {
            console.log(`Property "${key}" was updated. New value: "${ymap.get(key)}". Previous value: "${change.oldValue}".`);
        } else if (change.action === 'delete') {
            console.log(`Property "${key}" was deleted. New value: undefined. Previous value: "${change.oldValue}".`);
        }
    })
});

const wsProvider = new WebsocketProvider(
    'ws://192.168.2.14:9905', 'my-roomname',
    doc,
    //    { WebSocketPolyfill: ws }
)
wsProvider.on('status', event => {
    console.log(event.status) ;
})

wsProvider.on('sync', event => {
    console.log('sync', event) ;
    console.log("ymap", ymap.toJSON() )
    ymap.set("i", "chose")
    ymap.delete("g")
    console.log("ymap", ymap.toJSON() )

})
deno run –allow-all /home/sam/test/next/a.js
Yjs was already imported. This breaks constructor checks and will lead to issues! - https://github.com/yjs/yjs/issues/438         │E/IMGSRV  ( 1619): :0: DoKickTA: SGXKickTA() failed with error 9
Yjs was already imported. Importing different versions of Yjs often leads to issues.
This log will arise, because yjs is imported once and also as a dependency of y-websocket. Using a bundler may help solve this.
with python and pycrdt and pycrdt_websocket
import asyncio
import logging

from httpx_ws import aconnect_ws
from pycrdt import Doc, Map
from pycrdt_websocket import WebsocketProvider
from pycrdt_websocket.websocket import HttpxWebsocket

logging.basicConfig(level=logging.DEBUG)


def callback(event):
    print(event.keys)
    print(ymap)
    loop = asyncio.get_event_loop()
    loop.create_task(ch())


async def ch():
    print("ch")
    if "i" in ymap:
        del ymap["i"]


ydoc = Doc()
ymap = ydoc.get("my-map", type=Map)
ymap.observe(callback)


async def do():
    # ymap["key"] = "biduoe"
    ymap["g"] = "a"


async def client():
    room_name = "my-roomname"
    async with (
            aconnect_ws(f"http://192.168.2.14:9905/{room_name}") as websocket,
            WebsocketProvider(ydoc, HttpxWebsocket(websocket, room_name)),
    ):
        loop = asyncio.get_event_loop()
        loop.create_task(do())

        await asyncio.Future()  # run forever


asyncio.run(client())
in a browser with bun
I need a temporary project
{ echo ; echo ; } | bun init
bun install yjs
bun install y-websocket
[0m[1mbun init[0m helps you get started with a minimal project and tries to guess sensible defaults. [2mPress ^C anytime to quit[0m
[0m[36mpackage name[0m [2m(bun):[0m [0m[36mentry point[0m [2m(index.ts):[0m
[0m[32mDone![0m A package.json file was saved in the current directory.
+ [0m[2mindex.ts[0m
+ [0m[2mtsconfig.json[0m[2m (for editor auto-complete)[0m
+ [0m[2mREADME.md[0m
To get started, run:
[0m[36mbun run index.ts[0m
[0m[1mbun add [0m[2mv1.1.38 (bf2f153f)[0m
🔍 Resolving [1/1] [23D[0K 🔍 yjs [2/2] [17D[0K 🔍 lib0 [3/3] [18D[0K 🔍 isomorphic.js [4/3] [27D[0K 🔍 isomorphic.js [4/3] [27D[0K 🔒 Saving lockfile... [26D[0K
[0m[32minstalled[0m [1myjs[0m[2m@13.6.27[0m
[32m3[0m packages[0m installed [0m[2m[[1m936.00ms[0m[2m][0m[0m
[0m[1mbun add [0m[2mv1.1.38 (bf2f153f)[0m
🔍 Resolving [1/1] [23D[0K 🔍 y-websocket [2/2] [25D[0K 🔍 y-protocols [3/2] [25D[0K 🔒 Saving lockfile... [26D[0K
[0m[32minstalled[0m [1my-websocket[0m[2m@3.0.0[0m
[32m2[0m packages[0m installed [0m[2m[[1m762.00ms[0m[2m][0m[0m
Then, I can load and populate window
export { Doc } from "yjs"
export { WebsocketProvider } from "y-websocket"
Once put in index.ts I can run
bun build --target browser index.ts > yjs.js
Then, I can load yjs.js in the browser and run the same code that I used with deno.
<html>
  <head>
    <meta charset="UTF-8"/>
    <meta name="viewport" content="width=device-width, initial-scale=1.0" />
    <script type="module" src="./yjs.js"></script>
    <script type="module">
      import { Doc, WebsocketProvider } from './yjs.js'

      const doc = new Doc();
      const ymap = doc.getMap("my-map")

      ymap.observe(ymapEvent => {
          ymapEvent.target === ymap // => true

          // Find out what changed:
          // Option 1: A set of keys that changed
          ymapEvent.keysChanged // => Set
          // Option 2: Compute the differences
          ymapEvent.changes.keys // => Map

          // Sample code.
          ymapEvent.changes.keys.forEach((change, key) => {
              if (change.action === 'add') {
                  console.log(`Property "${key}" was added. Initial value: "${ymap.get(key)}".`);
              } else if (change.action === 'update') {
                  console.log(`Property "${key}" was updated. New value: "${ymap.get(key)}". Previous value: "${change.oldValue}".`);
              } else if (change.action === 'delete') {
                  console.log(`Property "${key}" was deleted. New value: undefined. Previous value: "${change.oldValue}".`);
              }
          })
      });

      const wsProvider = new WebsocketProvider(
          'ws://192.168.2.14:9905', 'my-roomname',
          doc,
          //    { WebSocketPolyfill: ws }
      )
      wsProvider.on('status', event => {
          console.log(event.status) ;
      })

      wsProvider.on('sync', event => {
          console.log('sync', event) ;
          console.log("ymap", ymap.toJSON() )
          ymap.set("i", "chose")
          ymap.delete("g")
          console.log("ymap", ymap.toJSON() )

      })

      // I can export the Doc so that it will be used in the dom
      window.doc = doc

    </script>
    <script src="https://hyperscript.org/js/_hyperscript_w9y.min.js"></script>
  </head>
  <body>
    <div _="def update(event)
            set my innerHTML to event.target.get('i')
            end

            init
            doc.getMap('my-map').observe(update)
            ">test</div>
  </body>
</html>
I can see the code working in the browser 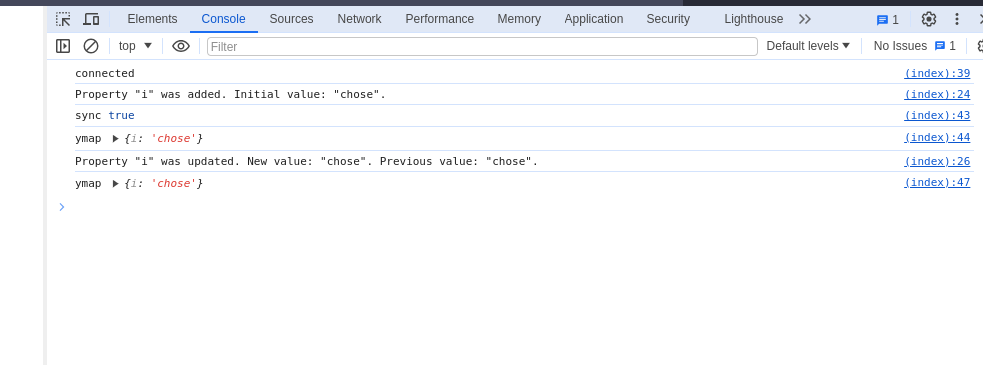
gundb
- External reference: https://gun.eco/docs/Graph-Guide
- External reference: https://gun.eco/docs/Todo-Dapp
- External reference: https://gun.eco/docs/
GUN documentation
GUN is fully decentralized (peer-to-peer or multi-master), meaning that changes are not controlled by a centralized server. A server can be just another peer in the network, one that may have more reliable resources than a browser. You save data on one machine, and it will sync it to other peers without needing a complex consensus protocol. It just works.
we recommend you include these dependencies with your app, rather than trusting a public CDN
Browsers (and internet firewalls) and even WebRTC, for legacy security reasons, won’t let you directly connect to other machines unless they have a publicly accessible IP address (your localhost might! If you have an IPv6 address and no firewall). To get around this, WebRTC uses public “signaling servers” to coordinate where non-IPv6 peers (like a browser) are, and then attempts to establish a P2P connection if possible.
If you want to have meta information about the relationship, simply create an “edge” node that both properties point to instead. Many graph databases do this by default, but because not all data structures require it, gun leaves it to you to specify.
Am I connected
Am I Connected? (Peer counting) There’s currently no single method provisioned to quickly check whether you’re connected, or to how many peers. However, you can retrieve gun’s backend list of peers, and then filter the list on specific parameters (which might change as Gun is currently reaching an alchemical state of transmutation).
const opt_peers = gun.back(‘opt.peers’); // get peers, as configured in the setup let connectedPeers = _.filter(Object.values(opt_peers), (peer)
> { return peer && peer.wire && peer.wire.readyState ==1 && peer.wire.OPEN=1 && peer.wire.constructor.name=‘WebSocket’; }); The length of connectedPeers corresponds to the connected peers, which you can now use in your UI.Reconnecting Here again, due to convoluted reasons which need high priority addressing, after going offline and then hopping back on, GUN doesn’t reliably re-connect to its peers (unless you’d refresh the page/app). In some cases, the peers even get removed from the opt.peers list which we’ve accessed above to count connected peers.
It’s being debated how to approach this most reasonably. In the meantime you can trigger a reconnect by re-adding the peers to GUN’s opt list using the following code:
gun.opt({peers: [‘http://server1.com/gun’, ‘http://server2.com/gun’]}); // re-add peers to GUN-options
gun.get(‘heartbeat’).put(“heartbeat”) // optional: tell GUN to put something small, forcing GUN to establish connection, as GUN is lazy by nature to make it save on data transfer. In the case of counting your peers using the previous example, after reconnecting you’ll see the peer count go back up.
Notes linking here
- every structure can be seen as a graph
- git-bug: Distributed, offline-first bug tracker embedded in git, with bridges
- gun object size limit
- local first
- planning poker using gundb
- sharing data from an iframe
- stopmotion android apps