Comment Sécher Votre Filament
Fleeting- Référence externe : https://www.technipages.com/3d-printing-basics-how-to-tell-if-your-filament-is-wet-and-how-to-dry-it
- Référence externe : https://3dinsider.com/dry-pla-filament/
- Référence externe : https://all3dp.com/fr/2/secher-filament-pla-abs-nylon/
- see,
Pour éviter d’avoir du filament humide, penser à stocker les filament à l’abris de l’air, avec du désiccant qui prendra l’humidité à sa place1.
-
pétille pendant l’impression4,
-
casse facilement5,
-
sort de la buse de façon irrégulière,
-
ne sèche pas bien (
), -
change de texture,
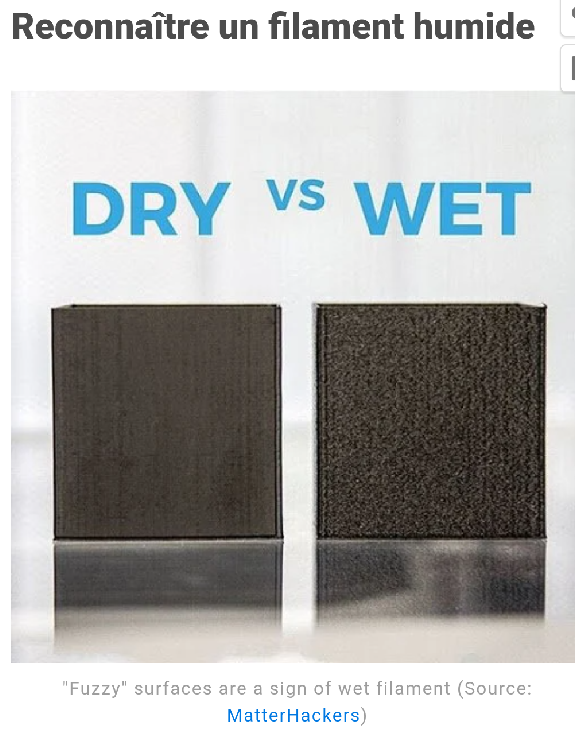
Il est probablement humide. Il faudrait le sécher6. Au four7 (attention à ne pas le surchauffer pendant la phase de préchauffage8), au déshydrateur alimentaire9 ou au séchoir à filament.
Notes pointant ici
Permalink
-
desiccants, pretty much any should work. Desiccants in packets or pouches are easiest to use, reuse, and move around, but if you need a lot of drying power for large storage containers it may be easier to buy loose beads in bulk.
— https://www.technipages.com/3d-printing-basics-how-to-tell-if-your-filament-is-wet-and-how-to-dry-it
↩︎airtight container, and then adding desiccants or even some form of heating element. Plastic tubs, pet food bins, and vacuum storage bags are all common and great storage options depending on your size, storage, and capacity needs
— https://www.technipages.com/3d-printing-basics-how-to-tell-if-your-filament-is-wet-and-how-to-dry-it
-
↩︎signes qui ne trompent pas :
- Mini explosions ou craquements durant l’extrusion
- Forte baisse de la résistance des pièces et de l’adhérence des couches
- Lignes d’extrusion irrégulières
- Stringing, blobs ou suintement anormalement marqués
- Surfaces à la texture inhabituelle et au toucher un peu « duveteux »
-
↩︎effects of a wet filament are severely reduced part strength, reduced layer adhesion, uneven extrusion lines, and unusually severe stringing, blobbing, or oozing
— https://www.technipages.com/3d-printing-basics-how-to-tell-if-your-filament-is-wet-and-how-to-dry-it
-
↩︎if you can hear popping and cracking sounds when extruding
— https://www.technipages.com/3d-printing-basics-how-to-tell-if-your-filament-is-wet-and-how-to-dry-it
-
↩︎filament that has held moisture for too long will lose its elasticity, eventually turning brittle
-
↩︎dry the wet filament, you need to heat it up, so the water slowly evaporates off.
— https://www.technipages.com/3d-printing-basics-how-to-tell-if-your-filament-is-wet-and-how-to-dry-it
-
To start off, you need a high-quality oven with accurate controls that can be set to temperatures as low as 40 to 50 °C. Although this is a good 20 °C below PLA’s glass transition temperature, the “low and slow” approach to drying PLA is the much safer route that ensures that you don’t end up with a fused filament.If you can set your oven to a temperature this low, then you can leave the spool in there for four to six hours without problems
↩︎solution la plus courante et la plus simple pour sécher le filament consiste à le passer directement au four. Il suffit de régler la température juste en dessous de la température de transition vitreuse du plastique et de laisser votre filament sécher entre 4 à 6 heures, le temps que toute l’humidité s’en échappe. Plus vous le laisserez longtemps au four, plus il sera sec.
PLA : entre 40 et 45 °C ABS : env. 80 °C Nylon : env. 80 °C
-
↩︎when using an oven, be sure to pre-heat the oven before putting the filament in, as they typically overshoot the specified temperature a bit when heating up
— https://www.technipages.com/3d-printing-basics-how-to-tell-if-your-filament-is-wet-and-how-to-dry-it
-
↩︎déshydrateur alimentaire fonctionne également très bien pour sécher le filament, surtout si vous n’avez pas le four adéquat