Konubinix' site

Make Sense of Keycloak, Openid Connect, Oauth 2.0, Jwt, Jws

Fleeting

make sense of keycloak, openid connect, oauth 2.0, jwt, jws.

I needed to setup some keycloak as IAM. I was fast overwhelmed with all the concepts that I’m supposed to know before hand.

Here is a recap of what I could make sense of.

Oauth 2.0 to define the authentication flow

OAuth 2.0 defines several roles.

OAuth defines four roles:

resource owner
An entity capable of granting access to a protected resource. When the resource owner is a person, it is referred to as an end-user.
resource server
The server hosting the protected resources, capable of accepting and responding to protected resource requests using access tokens.
client
An application making protected resource requests on behalf of the resource owner and with its authorization. The term “client” does not imply any particular implementation characteristics (e.g., whether the application executes on a server, a desktop, or other devices).
authorization server
The server issuing access tokens to the client after successfully authenticating the resource owner and obtaining authorization.

https://datatracker.ietf.org/doc/html/rfc6749#section-1.1

And defines several flows to:

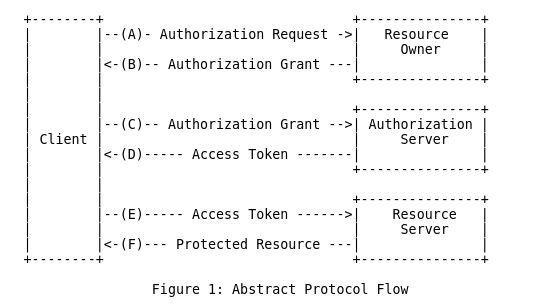
This abstract flow is defined like this:

  • (A) The client requests authorization from the resource owner. The authorization request can be made directly to the resource owner (as shown), or preferably indirectly via the authorization server as an intermediary.

  • (B) The client receives an authorization grant, which is a credential representing the resource owner’s authorization, expressed using one of four grant types defined in this specification or using an extension grant type. The authorization grant type depends on the method used by the client to request authorization and the types supported by the authorization server.

  • (C) The client requests an access token by authenticating with the authorization server and presenting the authorization grant.

  • (D) The authorization server authenticates the client and validates the authorization grant, and if valid, issues an access token.

  • (E) The client requests the protected resource from the resource server and authenticates by presenting the access token.

  • (F) The resource server validates the access token, and if valid, serves the request.

https://datatracker.ietf.org/doc/html/rfc6749

It distinguish between two types of clients:

In the later, it means that in the flow, the user is asked to login into the authorization server and then the client is given the access token (more on that token later).

It explains that the three following use cases1 where driving this specification:

  1. an old school web application, where the server can connect to the authorization server and then is confidential,
  2. a new style web application, where the logic is executed browser side, hence considered not trust worthy and public,
  3. a native application, where the logic is also executed in the user device, hence also considered not trust worthy and public,

Each client is given a client identifier by the authorization server. This identifier is not a secret. For confidential clients, a client secret is also given that allows the client to authenticate. It is said that public client may have a client secret, but that the authorization server should not actually take this into account, due to the non trust worthiness of the client.

There are 4 ways2 to have the resource owner grant, most of which use HTTP redirection:

  1. authorization code: redirecting the user to an authorization server to log in and redirect back to the client. It is optimized for confidential clients as it assumes the client is secure enough to store its refresh token,
  2. implicit: like the authorization code, but the client is directly given the access token instead of being redirected. This only makes sense when the client is implemented in a browser native language, such as javascript. It exists so as to make the client slightly more responsive, while it is less secure because there has been no intermediary authorization server to authenticate the user. It is optimized for public clients as it does not provide a refresh token and force the client to register anew often.
  3. resource owner user and password3: is considered a least preferred choice4 and assumes the resource owner trusts the client for not stealing or leaking per credentials.
  4. client credential: is a lot alike 3, but when the client is only used by one user, and then there is no need to have a user credential. In that case, the client identification is enough. It makes sense when the resource are actually under the exclusive control of the client.

In any case, the client eventually get an access token, that can be used to get access to the resource. The access token is considered ephemeral. This provides a mean to easily revoke ones right by the non possibility of getting a new fresh access token. To help refreshing the access token without getting through the whole grant flow, the authorization server may provide a refresh token that can be used in the future to claim for a new fresh access token.

When asking for an access token, the client provides a wanted scope. The authorization server may ignore some of this scope and eventually returns the scope for which the token is issued. What this scope gives access to is beyond the scope of the specification (pun intended).

In this specification, the access token is a short lived so-called bearer token.

Now, we need to dig a little bit into this token.

using a bearer token encoded in JWT format?

There is nothing in OAuth 2.0 against putting some information into the bearer token issued by the authorization server.

Even though JWT, JOSE header, JWS and JWE are defined in separate standards, they overlap and depend on each other. We can easily understand that they all combine to provide this concepts of a self-encoded access tokens.

JSON web tokens is a format to encode claims (a.k.a. key value pairs telling something about the resource owner). JWS Compact Serialization is the way to put this data into a URL (required by OAuth 2.0). This also appears to be the reason why claims must be as short as possible and the standardized claims have keys of only 3 characters (iss, sub, aud, exp,…).

JOSE header is defined in JWS (in here) and JWE (in here). It is a standard of encoding in json the information about how to use the JWS or JWE payload. It contains the type of the payload and the signature/encryption algorithms and hashes to use.

JSON Web Signature describes how to concatenate a JOSE header, a payload and a signature, encoded in base64 and then separated with spaces.

You can easily take a look at a JWS in the site https://jwt.io. By the way, the fact that this site is called JWT but actually shows JWS data is a sign that all those concepts are not meant to be thought separately. Therefore, when people talk about JWT, they often mean a JWS compactly serialized payload encoded in JWT (see also should I say JWT or JWT token, or JWS token or…?)

Hence, for example, the following JWS data, signed with the secret “test”.

eyJhbGciOiJIUzI1NiIsInR5cCI6IkpXVCJ9.eyJzdWIiOiIxMjM0NTY3ODkwIiwibmFtZSI6IkpvaG4gRG9lIiwiaWF0IjoxNTE2MjM5MDIyfQ.5mhBHqs5_DTLdINd9p5m7ZJ6XD0Xc55kIaCRY5r6HRA

Can easily be processed with the following python code

As stated in the appendix C, they don’t provide base64 padding, hence we artificially add an extra padding of “=” to make python implementation accept those base64 encoded content. Also, they replace the + and / character of the base64 alphabet respectively with - and _. This makes sense, as this content will eventually be put into a URL, but one could ask why not using a more URL friendly encoding, like base58 or base32.

Therefore the python code to read such data should be like:

import base64
def base64decode(content):
    return base64.b64decode(content.replace("-", "+").replace("_", "/") + "===")

def base64encode(content):
    return base64.b64encode(content).replace(b"+", b"-").replace(b"/", b"_").rstrip(b"=")
import json
jose_str, jwt_payload_str, signature = jws.split(".")
jose = json.loads(base64decode(jose_str))
jwt_payload = json.loads(base64decode(jwt_payload_str))
print(f"jose: {jose}")
print(f"jwt_payload: {jwt_payload}")
jose: {'alg': 'HS256', 'typ': 'JWT'}
jwt_payload: {'sub': '1234567890', 'name': 'John Doe', 'iat': 1516239022}

To check the signature, we have to construct the HMACSHA256 (HS256 in the JOSE header) of jose.jwt_payload with the key “test”.

import hmac
import hashlib
h = base64encode(hmac.new(secret.encode(), (jose_str + "." + jwt_payload_str).encode(), hashlib.sha256).digest()).decode()
print(h)
print(signature)
5mhBHqs5_DTLdINd9p5m7ZJ6XD0Xc55kIaCRY5r6HRA

Adding OpenID Connect

OpenID connect appears to be a specification that describes how to use OAuth 2.0 to get not only an access token, but also a so called Identity Token. This identity token is actually a a JWS token in which the JWT claims are user data.

The scope of OAuth 2.0 is used to define what data to return in the id token.

In order to get the id token along with the access token, the client needs to explicitly ask for the scope openid.

The authorization servers that talks OpenID connect language are called OpenID providers. They are implementations of the IdP concept. Also, the OAuth 2.0 client is referred to as the Relying Party.

This specification also tackle other topics, like OpenID Connect Provider discovery, but that goes beyond the scope of what I think I need to understand so far.

Keycloak, finally

Keycloak is the Identity Provider, it provides the way to specify how to log in, possibly using stuff like TOTP and return signed access tokens that can be used by the applications to give the client access to the resources of the resource owner.

As an openid provider

When configured in OpenID Connect mode, keycloak becomes an OpenID Provider.

We can connect and get an access token and a refresh token.

http --form http://localhost:8080/auth/realms/test/protocol/openid-connect/token grant_type=password username=test password=test client_id=test|jq -M
{
  "access_token": "eyJhbGciOiJSUzI1NiIsInR5cCIgOiAiSldUIiwia2lkIiA6ICJzZnRLYWpMbnRGeXBrTGh6cGo3bkhxMmxlU0wtdUxjbjk5NThCMG9QSmprIn0.eyJleHAiOjE2MzkxNTE3NzQsImlhdCI6MTYzOTE1MTQ3NCwianRpIjoiNTllMjQyNjktZjI3NC00MjRmLWJkZDUtNDdkNjMxOTUxOTQwIiwiaXNzIjoiaHR0cDovL2xvY2FsaG9zdDo4MDgwL2F1dGgvcmVhbG1zL3Rlc3QiLCJhdWQiOiJhY2NvdW50Iiwic3ViIjoiODgyY2NjNDMtODc5Yy00ZWI3LWI1MGMtOTY0YTc0NGJjMjc4IiwidHlwIjoiQmVhcmVyIiwiYXpwIjoidGVzdCIsInNlc3Npb25fc3RhdGUiOiI1OTUxYTQxNy1jZDcxLTRjMTgtYWJiNi0yNGU1NjNlMjlkMzIiLCJhY3IiOiIxIiwicmVhbG1fYWNjZXNzIjp7InJvbGVzIjpbImRlZmF1bHQtcm9sZXMtdGVzdCIsIm9mZmxpbmVfYWNjZXNzIiwidW1hX2F1dGhvcml6YXRpb24iXX0sInJlc291cmNlX2FjY2VzcyI6eyJhY2NvdW50Ijp7InJvbGVzIjpbIm1hbmFnZS1hY2NvdW50IiwibWFuYWdlLWFjY291bnQtbGlua3MiLCJ2aWV3LXByb2ZpbGUiXX19LCJzY29wZSI6InByb2ZpbGUgZW1haWwiLCJzaWQiOiI1OTUxYTQxNy1jZDcxLTRjMTgtYWJiNi0yNGU1NjNlMjlkMzIiLCJlbWFpbF92ZXJpZmllZCI6dHJ1ZSwicHJlZmVycmVkX3VzZXJuYW1lIjoidGVzdCIsImVtYWlsIjoiYUBhLmEifQ.fo9tM3sZcGi7S3VeQdzLSXDRrHGMyF9plM5ZpWSA3MTaHtdzyMiUDtsaOWsDyLC9F03AyhCb0G5eR-wP5p_rl2pswh4WLnYmNN87SPSDn1V9yUzwzd-wcxsdVhj-ux_5YdxZpZsL0mzvxXMI1Mjzb56qBI9aA8FjOm9_aujuhCUlG4MT-K9XFuzkbS_ie9Lcz0ShsUPeSILb-yjyUYj0y9Pauf0YUAWRJbjXjDur-CxxawpuSLMl25Ocytxr2csrZR1cxLXHU5WhB0fz9Ss1tz6s3uaCoqEvBn3Iu-w58llMloLWbYQTTjoG7tDUpFvfwWpKoRdXVll6qTNcrmZ8IQ",
  "expires_in": 300,
  "refresh_expires_in": 1800,
  "refresh_token": "eyJhbGciOiJIUzI1NiIsInR5cCIgOiAiSldUIiwia2lkIiA6ICJlOTE0YTAwYi01YmI4LTRjMGUtODJlYi1iZGZmYmM2NTRkMTUifQ.eyJleHAiOjE2MzkxNTMyNzQsImlhdCI6MTYzOTE1MTQ3NCwianRpIjoiNzE4MTQ0M2QtMjk5My00MWI1LTgzODctYjE4NDA4MjhhZmFiIiwiaXNzIjoiaHR0cDovL2xvY2FsaG9zdDo4MDgwL2F1dGgvcmVhbG1zL3Rlc3QiLCJhdWQiOiJodHRwOi8vbG9jYWxob3N0OjgwODAvYXV0aC9yZWFsbXMvdGVzdCIsInN1YiI6Ijg4MmNjYzQzLTg3OWMtNGViNy1iNTBjLTk2NGE3NDRiYzI3OCIsInR5cCI6IlJlZnJlc2giLCJhenAiOiJ0ZXN0Iiwic2Vzc2lvbl9zdGF0ZSI6IjU5NTFhNDE3LWNkNzEtNGMxOC1hYmI2LTI0ZTU2M2UyOWQzMiIsInNjb3BlIjoicHJvZmlsZSBlbWFpbCIsInNpZCI6IjU5NTFhNDE3LWNkNzEtNGMxOC1hYmI2LTI0ZTU2M2UyOWQzMiJ9.IdXCOw1kQwVsQG-5kt_jB51I7SQpghfYQhz5DnI6_jE",
  "token_type": "Bearer",
  "not-before-policy": 0,
  "session_state": "5951a417-cd71-4c18-abb6-24e563e29d32",
  "scope": "profile email"
}

Here is a dumb bash function that can be used to parse the output of the keycloak token endpoint.

parse () {
    local name=$1
    jq .$name | cut -f2 -d. | base64 -d|jq -M
}

Then, by looking at the access token, we can see this:

http --form http://localhost:8080/auth/realms/test/protocol/openid-connect/token grant_type=password username=test password=test client_id=test|parse access_token
{
  "exp": 1639151664,
  "iat": 1639151364,
  "jti": "4d638bb1-082d-4636-929e-025e07ea4657",
  "iss": "http://localhost:8080/auth/realms/test",
  "aud": "account",
  "sub": "882ccc43-879c-4eb7-b50c-964a744bc278",
  "typ": "Bearer",
  "azp": "test",
  "session_state": "fea3ccc4-c6b4-4fe6-88e6-8e797f5371a2",
  "acr": "1",
  "realm_access": {
    "roles": [
      "default-roles-test",
      "offline_access",
      "uma_authorization"
    ]
  },
  "resource_access": {
    "account": {
      "roles": [
        "manage-account",
        "manage-account-links",
        "view-profile"
      ]
    }
  },
  "scope": "profile email",
  "sid": "fea3ccc4-c6b4-4fe6-88e6-8e797f5371a2",
  "email_verified": true,
  "preferred_username": "test",
  "email": "a@a.a"
}

We can see that the “typ” is Bearer, meaning “don’t try to interpret the content, I’m just a token to authenticate”, but the other claims contains much information about the user, like an OpenID Token would do.

By providing the scope openid, we get.

http --form http://localhost:8080/auth/realms/test/protocol/openid-connect/token grant_type=password username=test password=test client_id=test scope=openid|jq -M
{
  "access_token": "eyJhbGciOiJSUzI1NiIsInR5cCIgOiAiSldUIiwia2lkIiA6ICJzZnRLYWpMbnRGeXBrTGh6cGo3bkhxMmxlU0wtdUxjbjk5NThCMG9QSmprIn0.eyJleHAiOjE2MzkxNTE4MzEsImlhdCI6MTYzOTE1MTUzMSwianRpIjoiZGI5NmYwMGItYzNiZS00N2VlLWE4ZTUtZTQzNmRiYWQyYmRmIiwiaXNzIjoiaHR0cDovL2xvY2FsaG9zdDo4MDgwL2F1dGgvcmVhbG1zL3Rlc3QiLCJhdWQiOiJhY2NvdW50Iiwic3ViIjoiODgyY2NjNDMtODc5Yy00ZWI3LWI1MGMtOTY0YTc0NGJjMjc4IiwidHlwIjoiQmVhcmVyIiwiYXpwIjoidGVzdCIsInNlc3Npb25fc3RhdGUiOiJjZDRlYjVhMS0xYTk5LTRlNWItOGMyZC1iYjViNDNmMGRiYmEiLCJhY3IiOiIxIiwicmVhbG1fYWNjZXNzIjp7InJvbGVzIjpbImRlZmF1bHQtcm9sZXMtdGVzdCIsIm9mZmxpbmVfYWNjZXNzIiwidW1hX2F1dGhvcml6YXRpb24iXX0sInJlc291cmNlX2FjY2VzcyI6eyJhY2NvdW50Ijp7InJvbGVzIjpbIm1hbmFnZS1hY2NvdW50IiwibWFuYWdlLWFjY291bnQtbGlua3MiLCJ2aWV3LXByb2ZpbGUiXX19LCJzY29wZSI6Im9wZW5pZCBwcm9maWxlIGVtYWlsIiwic2lkIjoiY2Q0ZWI1YTEtMWE5OS00ZTViLThjMmQtYmI1YjQzZjBkYmJhIiwiZW1haWxfdmVyaWZpZWQiOnRydWUsInByZWZlcnJlZF91c2VybmFtZSI6InRlc3QiLCJlbWFpbCI6ImFAYS5hIn0.fo8vkoPHaLrhnFIoz5dWX_zTwBoOb5KS3W7TjGj_o5Krw5MGrqyMTJDbAkCGNx3O2WgQkF_KvenX1dR9dERVNpsmROGk1Oeh5rRlEW4o4qZEwbnDQNJNIMGJj9XzZuFVSsn0DQtezcHmDYTJtETHNtKIz8JH2FeDYjSkzPa6Rm-YEBKDXdBk1GJ5LPY5lHQtwZCXIc0bET3NLAnqtodEd3373E0i-pdwPqR7jrVDCqAUQjYcpJc4O9Uvs8JcFsGX2kmigh-LanYKZtQQvlKyg5HZ--tCNqgHs-5Gj_QZlG5RoOQgcEmw5lcaKu8hgxJQKudeseLePBBBAIsh2LtAVQ",
  "expires_in": 300,
  "refresh_expires_in": 1800,
  "refresh_token": "eyJhbGciOiJIUzI1NiIsInR5cCIgOiAiSldUIiwia2lkIiA6ICJlOTE0YTAwYi01YmI4LTRjMGUtODJlYi1iZGZmYmM2NTRkMTUifQ.eyJleHAiOjE2MzkxNTMzMzEsImlhdCI6MTYzOTE1MTUzMSwianRpIjoiYjg4YTg4MWMtZWFlOC00ZTRiLWFiODctYTJjZGQ2YjI2MWY3IiwiaXNzIjoiaHR0cDovL2xvY2FsaG9zdDo4MDgwL2F1dGgvcmVhbG1zL3Rlc3QiLCJhdWQiOiJodHRwOi8vbG9jYWxob3N0OjgwODAvYXV0aC9yZWFsbXMvdGVzdCIsInN1YiI6Ijg4MmNjYzQzLTg3OWMtNGViNy1iNTBjLTk2NGE3NDRiYzI3OCIsInR5cCI6IlJlZnJlc2giLCJhenAiOiJ0ZXN0Iiwic2Vzc2lvbl9zdGF0ZSI6ImNkNGViNWExLTFhOTktNGU1Yi04YzJkLWJiNWI0M2YwZGJiYSIsInNjb3BlIjoib3BlbmlkIHByb2ZpbGUgZW1haWwiLCJzaWQiOiJjZDRlYjVhMS0xYTk5LTRlNWItOGMyZC1iYjViNDNmMGRiYmEifQ.025A0GkY_Se4NxldFhDibQvXhVR6dVYcprzAjo0NDcQ",
  "token_type": "Bearer",
  "id_token": "eyJhbGciOiJSUzI1NiIsInR5cCIgOiAiSldUIiwia2lkIiA6ICJzZnRLYWpMbnRGeXBrTGh6cGo3bkhxMmxlU0wtdUxjbjk5NThCMG9QSmprIn0.eyJleHAiOjE2MzkxNTE4MzEsImlhdCI6MTYzOTE1MTUzMSwiYXV0aF90aW1lIjowLCJqdGkiOiIwMzMyMDg1Ny04OTU3LTRlYzQtYTQxNi1hMTA3ZjBhYzQ5MjQiLCJpc3MiOiJodHRwOi8vbG9jYWxob3N0OjgwODAvYXV0aC9yZWFsbXMvdGVzdCIsImF1ZCI6InRlc3QiLCJzdWIiOiI4ODJjY2M0My04NzljLTRlYjctYjUwYy05NjRhNzQ0YmMyNzgiLCJ0eXAiOiJJRCIsImF6cCI6InRlc3QiLCJzZXNzaW9uX3N0YXRlIjoiY2Q0ZWI1YTEtMWE5OS00ZTViLThjMmQtYmI1YjQzZjBkYmJhIiwiYXRfaGFzaCI6ImF6RGNLeWdhMUtOSWtDRU11VW0yakEiLCJhY3IiOiIxIiwic2lkIjoiY2Q0ZWI1YTEtMWE5OS00ZTViLThjMmQtYmI1YjQzZjBkYmJhIiwiZW1haWxfdmVyaWZpZWQiOnRydWUsInByZWZlcnJlZF91c2VybmFtZSI6InRlc3QiLCJlbWFpbCI6ImFAYS5hIn0.FSTxY25U3J9cwmKIzMoSwwOpoimNFypPNy_H3eDkIHyBYCumAL3pqLpCrou07j7bMCe7qe8pmiLWmqKMcrj24FiAEb-XFhxI1dNm5gSbAOTrR30W7DOg_QK1K3mebm--SVNhbvt6eKyyjRhkf6t38ekVBZbPwSnkFEp3enlV0351P3D7mIRjRzVo1BtvKJSRGBxFVIDUYSOHeRXZ7q1hQKRNQGe7Bf1Ytr6Eu2RhwMCGmR4uoPKs6Apr2xUUd66la_ohSQSGG1IVRRQ7l7jYe7RYh-TY7AiN7EBwteiAvzhlLxpUm6WbWLvAgStNxjwLOz4QdyFoHCYHcdD4iBpc8Q",
  "not-before-policy": 0,
  "session_state": "cd4eb5a1-1a99-4e5b-8c2d-bb5b43f0dbba",
  "scope": "openid profile email"
}

Now, along with access_token and refresh token, there is indeed also the id_token.

Let’s take a look at it:

http --form http://localhost:8080/auth/realms/test/protocol/openid-connect/token grant_type=password username=test password=test client_id=test scope=openid|parse id_token
{
  "exp": 1639151872,
  "iat": 1639151572,
  "auth_time": 0,
  "jti": "8cf814b3-1a30-47ab-8476-df2402902ea8",
  "iss": "http://localhost:8080/auth/realms/test",
  "aud": "test",
  "sub": "882ccc43-879c-4eb7-b50c-964a744bc278",
  "typ": "ID",
  "azp": "test",
  "session_state": "a9809a96-1591-468f-a285-620410ed620c",
  "at_hash": "nzfAoyobWNxUQrUthi3iLQ",
  "acr": "1",
  "sid": "a9809a96-1591-468f-a285-620410ed620c",
  "email_verified": true,
  "preferred_username": "test",
  "email": "a@a.a"
}

Actually, the same information is provided. The only difference appears to be that “typ” is now ID, the “aud” is now the client id (meaning that the id token is meant to be used by the client and not the resource server5) and all the keycloak specific stuff are gone.

Then, one may naively think that if one needs to get the official client id as per the specification, the scope=openid is needed, but if the purpose is to get user information, the access_token could be more than enough.

Actually, they are conceptually different, so I would recommend to use one or the other depending on the goal to reach and the expected piece of code that is supposed to interpret it. The client is supposed to interpret the ID Token, while the access token is supposed to make sens only for the resource server (see ID Tokens vs Access Tokens). Therefore, the client should not make any assumption about what is inside the access token and use the id token to find user information.

Also, this data is signed using RSA, as the JOSE header indicates.

http --form http://localhost:8080/auth/realms/test/protocol/openid-connect/token grant_type=password username=test password=test client_id=test scope=openid|jq -r .access_token|cut -f 1 -d.|base64 -d|jq -M
{
  "alg": "RS256",
  "typ": "JWT",
  "kid": "dBwkp92GraFc10rvP5xbRByVHDkwl2nph_AIufTaheY"
}

The public key can be seen using the appropriate endpoint6.

http --form http://localhost:8080/auth/realms/test/protocol/openid-connect/certs |jq -r -M '.keys[] | select(.alg == "RS256")'

{
  "kid": "dBwkp92GraFc10rvP5xbRByVHDkwl2nph_AIufTaheY",
  "kty": "RSA",
  "alg": "RS256",
  "use": "sig",
  "n": "ndmgnvbpQUvUkphE1XKmRewn3BF6sCO8zxPb75khWkpxDOiSVnSpq3KB0Xun9IwCUkep7H0x3QVP-Ehf-pyUJKBygePzzQ7EeQmM1L4DsVv3z6X05S0jJB_qKvEK1kS1AsGUu5lflvYYWMA-qxUiQOMz0sTPuiqSZVRSAn3jKXtssVROpIiUe6rtktsJaKGV0HqqcJAaVa_GZqBlsi6Qmi0TNqQO9D8WaQn9IwfrJ7i-n8pOxDNH1rNDNjUemIyu9Al4_3VPYdBxCMHfPB1ziFhi6sTsYLTShFA-ZASfZx-vjgYbxvhlxl50MXiegYCQ5Giu5lMjCX-SbxhgCEP71Q",
  "e": "AQAB",
  "x5c": [
    "MIIClzCCAX8CBgF9s0wfBDANBgkqhkiG9w0BAQsFADAPMQ0wCwYDVQQDDAR0ZXN0MB4XDTIxMTIxMzEwMTU1MFoXDTMxMTIxMzEwMTczMFowDzENMAsGA1UEAwwEdGVzdDCCASIwDQYJKoZIhvcNAQEBBQADggEPADCCAQoCggEBAJ3ZoJ726UFL1JKYRNVypkXsJ9wRerAjvM8T2++ZIVpKcQzoklZ0qatygdF7p/SMAlJHqex9Md0FT/hIX/qclCSgcoHj880OxHkJjNS+A7Fb98+l9OUtIyQf6irxCtZEtQLBlLuZX5b2GFjAPqsVIkDjM9LEz7oqkmVUUgJ94yl7bLFUTqSIlHuq7ZLbCWihldB6qnCQGlWvxmagZbIukJotEzakDvQ/FmkJ/SMH6ye4vp/KTsQzR9azQzY1HpiMrvQJeP91T2HQcQjB3zwdc4hYYurE7GC00oRQPmQEn2cfr44GG8b4ZcZedDF4noGAkORoruZTIwl/km8YYAhD+9UCAwEAATANBgkqhkiG9w0BAQsFAAOCAQEAJuq29FRykgyP5P2wcKq5Uvc0Tk/549zRY8BZtdu/TLZRjw/0T3Hx4ml0fPBfsYroGs4LNuoPPKdPPKObncW9SLKYUdru2UQXKksQQLTjwWlX12Cu60fewin4+15cP7DWQNxhNArntGvBVhYoFbOb/xPDlygsHWNdTILe46DoqBB3cNCLLHHdKviI2Imi2dHgiAmWDi2NGmzwtZ9cI/3i7Qmk8Hid6wQFiWTOUXNUcgo0Z9lSv/kJrL3zrRCugLV1f97Q/sWGnvBZ2T5Kv15XFaZDaE2tZHCxHAyDNgk4OtWDUDJzR23k0L6MejKaKZiwyloNHWVP7c+Fx6sOyb5Www=="
  ],
  "x5t": "JGoQvp7PEffvd4wbSAr4RxGwaL8",
  "x5t#S256": "CmEYBoMSHOcMju2w7nFt1GNumNoq3SxGiXMFa1mPeLM"
}

Say we get the following access token

http --form http://localhost:8080/auth/realms/test/protocol/openid-connect/token grant_type=password username=test password=test client_id=test|jq -r .access_token
eyJhbGciOiJSUzI1NiIsInR5cCIgOiAiSldUIiwia2lkIiA6ICJkQndrcDkyR3JhRmMxMHJ2UDV4YlJCeVZIRGt3bDJucGhfQUl1ZlRhaGVZIn0.eyJleHAiOjE2MzkzOTI1MjMsImlhdCI6MTYzOTM5MjIyMywianRpIjoiMTVjY2YxNmItNmJmMy00MDY5LWFjZTgtYjBlMTU4MzcyZjc3IiwiaXNzIjoiaHR0cDovL2xvY2FsaG9zdDo4MDgwL2F1dGgvcmVhbG1zL3Rlc3QiLCJhdWQiOiJhY2NvdW50Iiwic3ViIjoiMWRmYjIwMjAtM2RiNS00OGFiLThkMGEtNDUxY2I4ZjBhMTk4IiwidHlwIjoiQmVhcmVyIiwiYXpwIjoidGVzdCIsInNlc3Npb25fc3RhdGUiOiJmMGUxODIxOS0wZjBjLTQ2ZjMtODI5Mi1mYTYwNzRlNjc1NjciLCJhY3IiOiIxIiwicmVhbG1fYWNjZXNzIjp7InJvbGVzIjpbImRlZmF1bHQtcm9sZXMtdGVzdCIsIm9mZmxpbmVfYWNjZXNzIiwidW1hX2F1dGhvcml6YXRpb24iXX0sInJlc291cmNlX2FjY2VzcyI6eyJhY2NvdW50Ijp7InJvbGVzIjpbIm1hbmFnZS1hY2NvdW50IiwibWFuYWdlLWFjY291bnQtbGlua3MiLCJ2aWV3LXByb2ZpbGUiXX19LCJzY29wZSI6InByb2ZpbGUgZW1haWwiLCJzaWQiOiJmMGUxODIxOS0wZjBjLTQ2ZjMtODI5Mi1mYTYwNzRlNjc1NjciLCJlbWFpbF92ZXJpZmllZCI6ZmFsc2UsInByZWZlcnJlZF91c2VybmFtZSI6InRlc3QifQ.E6RNELN5jJnkaA29XHPloBWEvd11C41YIYym1sgO6Q00iVYfRXoqI67wRoBLDFHjwq1hh8NPPoQp5NMSr71BlaPzayPUeZYZxAV7QGVBJzfaF0n95QGTLrV-KdHE-f0cxz5YAib87aWbci1-QMFblobhWLA3QL-Rie89Z3DhPMtuYxW21QLj9oWeATsZpWm9w0S7KM1x2vc1pYRsGElobzpgceZXySay-0GYM6v71sK9p0PfUhNWm9Pr3gtKkLnLG3McJmCmml5xj7bDhgDnpcGWfiP2CYHNUVFEkmbclPFc_Zd0fGiFYmxofAFIPtcjptrAyEHFZK55tgLQqYwXEw

Then, using of the python-jose library, we can check this token.

import json
from jose import jws

print(json.dumps(json.loads(jws.verify(access_token, public_key, algorithms="RS256").decode()), indent=4))
{
    "exp": 1639392523,
    "iat": 1639392223,
    "jti": "15ccf16b-6bf3-4069-ace8-b0e158372f77",
    "iss": "http://localhost:8080/auth/realms/test",
    "aud": "account",
    "sub": "1dfb2020-3db5-48ab-8d0a-451cb8f0a198",
    "typ": "Bearer",
    "azp": "test",
    "session_state": "f0e18219-0f0c-46f3-8292-fa6074e67567",
    "acr": "1",
    "realm_access": {
        "roles": [
            "default-roles-test",
            "offline_access",
            "uma_authorization"
        ]
    },
    "resource_access": {
        "account": {
            "roles": [
                "manage-account",
                "manage-account-links",
                "view-profile"
            ]
        }
    },
    "scope": "profile email",
    "sid": "f0e18219-0f0c-46f3-8292-fa6074e67567",
    "email_verified": false,
    "preferred_username": "test"
}

In case the signature would have failed, python-jose would have raised an error.

Describing roles and scopes and mapping

In keycloak, the users are part of groups that share the same attributes.

The oauth 2.0 scopes (called client scope in keycloak) are associated with mappers that describes what user/group attribute will be returned in the claims and how they will be returned.

You can define those mappers the scope and then associate a client scope to a client, or directly create a mapper inside a client.

Those mappers can be of a lot of kind, and use a lot of sources of user information (like group, roles) as input. They eventually provide the claims to put in the access token. It is to be noted that it is asked whether to provide this information in the id token or in the access token or not.

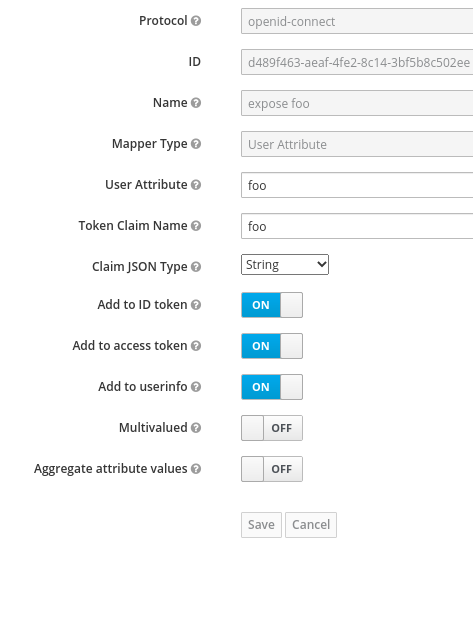
For example, say you add the attribute foo=bar in the user test.

Then, in the client Mapper, you add one that reads the value of foo.

Then you will see the this data in the access token.

read_access_token () {
    http --form http://localhost:8080/auth/realms/test/protocol/openid-connect/token grant_type=password username=test password=test client_id=test|parse access_token
}

read_access_token
{
  "exp": 1639153967,
  "iat": 1639153667,
  "jti": "58d7c8de-5d1e-4835-9f2d-efd87696e5bb",
  "iss": "http://localhost:8080/auth/realms/test",
  "aud": "account",
  "sub": "882ccc43-879c-4eb7-b50c-964a744bc278",
  "typ": "Bearer",
  "azp": "test",
  "session_state": "c65e588d-c20f-4f85-b528-18da3d948447",
  "acr": "1",
  "realm_access": {
    "roles": [
      "default-roles-test",
      "offline_access",
      "uma_authorization"
    ]
  },
  "resource_access": {
    "account": {
      "roles": [
        "manage-account",
        "manage-account-links",
        "view-profile"
      ]
    }
  },
  "scope": "profile email",
  "sid": "c65e588d-c20f-4f85-b528-18da3d948447",
  "email_verified": true,
  "foo": "bar",
  "preferred_username": "test",
  "email": "a@a.a"
}

You can see that the access token shows the roles associated with a user.

Actually, the roles are simple words that only make sense for the application that will use them.

You can map users and groups to roles using the “role mapping” notion.

Say you define a role called somerole and map it to the user test.

Then, you can see it

{
  "exp": 1639154206,
  "iat": 1639153906,
  "jti": "f373389c-fda7-4a1c-8292-55b943717038",
  "iss": "http://localhost:8080/auth/realms/test",
  "aud": "account",
  "sub": "882ccc43-879c-4eb7-b50c-964a744bc278",
  "typ": "Bearer",
  "azp": "test",
  "session_state": "d1b8d758-ba84-4b7d-9f41-a4fdad57f241",
  "acr": "1",
  "realm_access": {
    "roles": [
      "default-roles-test",
      "somerole",
      "offline_access",
      "uma_authorization"
    ]
  },
   "resource_access": {
    "account": {
      "roles": [
        "manage-account",
        "manage-account-links",
        "view-profile"
      ]
    }
  },
  "scope": "profile email",
  "sid": "d1b8d758-ba84-4b7d-9f41-a4fdad57f241",
  "email_verified": true,
  "foo": "bar",
  "preferred_username": "test",
  "email": "a@a.a"
}

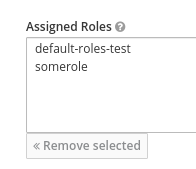
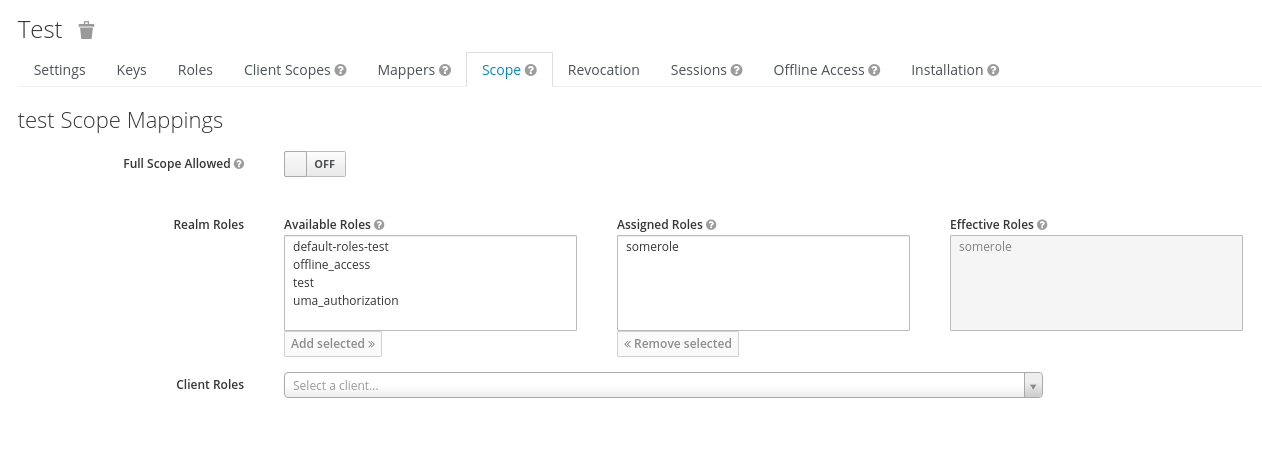
The access token returned by keycloak will return the roles associated with the user. This can be filtered using the “scope” tab of the client, thus limiting the returned roles to only those that make sense for the client.

Thus, by providing this scope limitation in the client.

You eventually get only that role returned.

{
  "exp": 1639154248,
  "iat": 1639153948,
  "jti": "2b8f0fa5-4a97-4a6c-b366-2b19313d2e0f",
  "iss": "http://localhost:8080/auth/realms/test",
  "sub": "882ccc43-879c-4eb7-b50c-964a744bc278",
  "typ": "Bearer",
  "azp": "test",
  "session_state": "84211814-2f3c-4b07-b796-2a211a0c3d11",
  "acr": "1",
  "realm_access": {
    "roles": [
      "somerole"
    ]
  },
  "scope": "profile email",
  "sid": "84211814-2f3c-4b07-b796-2a211a0c3d11",
  "email_verified": true,
  "foo": "bar",
  "preferred_username": "test",
  "email": "a@a.a"
}

Now, here is the origin of this part of the answer:

"resource_access": {
  "account": {
    "roles": [
      "manage-account",
      "manage-account-links",
      "view-profile"
    ]
  }
},

It comes from the default configuration of the client scopes. By default, a new client comes with the client scope role, that provides, among other things, a mapper called “client roles”.

This mapper provides the token claim “resource_access.${client_id}.roles”. So that data apparently comes from a client called “account” that would provides roles.

And we indeed can find the client named account with, among others, those roles configured.

By adding the user to some of the other roles, we can see them appear in the answer. Those three roles (manage-account, manage-account-links and view-profile) where shown by default because they are defined as default roles for the account client. This is difficult to find out because it is not in the client configuration panel, but in the role panel, when asking explicitly for the default roles of this client.

How do I use this in real life?

Now that I understand what are jwt, jws, oauth 2.0, openid connect and keycloak and how keycloak works, I need to decide how I want to make the whole stuff work.

Actually, I did not find any resource or standard explaining a “correct” way of making the whole thing.

Keycloak provides ways of describing the resources and the link with the roles in concepts like permissions (see https://www.keycloak.org/docs/latest/authorization_services/ ). It also supports complicated flows following the User-Managed Access standard.

But I feel like it most cases using keycloak in an openid connect fashion, the paradigm is to let keycloak provide the tokens describing the user roles and let the resource server decide what kind of resources to serve based on that information.

So, I guess the usage I would be:

  1. use keycloak in openid-connect mode,
  2. describe roles that indicate what one can do about the resource

Notes linking here


  1. web application
    A web application is a confidential client running on a web server. Resource owners access the client via an HTML user interface rendered in a user-agent on the device used by the resource owner. The client credentials as well as any access token issued to the client are stored on the web server and are not exposed to or accessible by the resource owner.
    user-agent-based application
    A user-agent-based application is a public client in which the client code is downloaded from a web server and executes within a user-agent (e.g., web browser) on the device used by the resource owner. Protocol data and credentials are easily accessible (and often visible) to the resource owner. Since such applications reside within the user-agent, they can make seamless use of the user-agent capabilities when requesting authorization.
    native application
    A native application is a public client installed and executed on the device used by the resource owner. Protocol data and credentials are accessible to the resource owner. It is assumed that any client authentication credentials included in the application can be extracted. On the other hand, dynamically issued credentials such as access tokens or refresh tokens can receive an acceptable level of protection. At a minimum, these credentials are protected from hostile servers with which the application may interact. On some platforms, these credentials might be protected from other applications residing on the same device.

    https://datatracker.ietf.org/doc/html/rfc6749

     ↩︎
  2. An authorization grant is a credential representing the resource owner’s authorization (to access its protected resources) used by the client to obtain an access token

    https://datatracker.ietf.org/doc/html/rfc6749

     ↩︎
  3. The resource owner password credentials (i.e., username and password) can be used directly as an authorization grant to obtain an access token.

    https://datatracker.ietf.org/doc/html/rfc6749

     ↩︎
  4. The credentials should only be used when there is a high degree of trust between the resource owner and the client (e.g., the client is part of the device operating system or a highly privileged application), and when other authorization grant types are not available (such as an authorization code)

    https://datatracker.ietf.org/doc/html/rfc6749

     ↩︎
    • ID tokens are meant to be read by the OAuth client. Access tokens are meant to be read by the resource server.
    • ID tokens are JWTs. Access tokens can be JWTs but may also be a random string.
    • ID tokens should never be sent to an API. Access tokens should never be read by the client

    https://oauth.net/id-tokens-vs-access-tokens/

     ↩︎
  5. The realm RSA public key is retrieved from the endpoint

    […]

    Obtaining a certificate file for the realm public key (.pem format)

    The x5c filed value is copied between —–BEGIN CERTIFICATE—–

    —–END CERTIFICATE—– directives

    https://www.janua.fr/keycloak-access-token-verification-example/

     ↩︎